


Taking a US passport photo at home can save you a lot of time and money. Here are some simple steps to help you take a professional-looking photo that meets all the requirements.
1. Find a suitable location: You need to take the photo in a well-lit area that has a neutral background.
2. Set up your camera: You can use a smartphone or digital camera to take the photo. Make sure you have enough space on your device to save the photo. The camera should be positioned at eye level and the lens should be at least 4 feet away from you. Make sure the camera is in focus before taking the photo.
3. Dress appropriately: You should wear normal clothing in your US passport photo. Avoid wearing hats, sunglasses, or anything else that may obscure your face. If you normally wear glasses, you can keep them on for the photo.
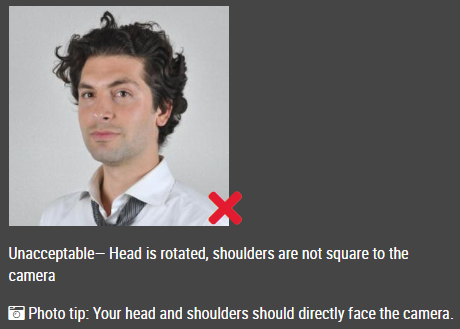
4. Pose correctly: You should face the camera directly with a neutral expression. Keep your mouth closed and look straight ahead. Make sure your ears are visible, and do not tilt your head up or down.
5. Take the photo: Ask a friend or family member to take the photo for you. Make sure they stand at least 4 feet away from you and use the camera’s flash. Take a few photos to ensure you have at least one good shot.
6. Edit the photo: You can use https://www.idphotodiy.com/ to crop the photo to the correct size (2 inches by 2 inches) and adjust the brightness and contrast to make the photo look professional. The website will remove the background automatically as well.
7. Print the photo: Once you have edited the photo, you can print it at home or at a local photo center. Make sure the photo is printed on high-quality photo paper.
By following these simple steps, you can take a US passport photo at home that meets all the requirements. This can save you time and money, and ensure that your passport application is not delayed due to an unacceptable photo.